MCP Setup Guide
Create, schedule, and publish Substack notes directly from Claude or Cursor — no browser tab needed.
How It Works
The MCP (Model Context Protocol) lets your AI assistant talk directly to Quick Viral Notes. Instead of switching between browser tabs, you stay in one conversation — ask your AI to draft notes, check your schedule, or plan your content calendar. The Chrome extension then handles the actual publishing to Substack.
Your Workflow
AI orchestrates & schedules • Extension publishes
What can you do with the MCP? View your notes dashboard, see planned and published notes, create new notes, schedule them for specific dates and times — all from within your AI conversation.
Prerequisites
You need all three of these. The workflow doesn't work without any one of them.
1. QVN Account
Sign up or sign in to Quick Viral Notes. This is where you generate your API token and where your notes live. Currently in beta — reach out to get access.
2. Chrome Extension
This is what actually publishes your notes to Substack. The MCP orchestrates, but the extension takes the action. Install from Chrome Web Store.
3. The MCP
The bridge between your AI and QVN. You'll install it into one of: Claude Desktop, Claude Code, or Cursor. Setup takes about 2 minutes.
How they fit together: Your AI client (Claude/Cursor) uses the MCP to plan and schedule notes. The Chrome extension watches for scheduled notes and publishes them to Substack at the right time. All three pieces need to be in place for the full workflow.
Which AI client should I pick? Claude Desktop is the easiest if you just want to chat and manage notes. Cursor is great if you're already coding with it. Claude Code is for terminal-based workflows.
Step 1: Get Your API Token
Your API token is what connects your AI client to your QVN account. You'll generate it once and paste it into your setup.
-
Go to Settings → Substack Notes MCP
Scroll down to the "Substack Notes MCP" section. -
Click "Generate Token"
You'll see a token that starts withqvn_sk_. This is your API key. -
Copy and save it somewhere safe
The token is only shown once. If you lose it, you can always generate a new one (which revokes the old one).
Keep your token private. Anyone with your token can read and write to your QVN account. If you think it's been compromised, revoke it immediately from Settings and generate a new one.
Step 2: Install the MCP
Choose your AI client below and follow the instructions. Each one takes about 2 minutes.
Option A: One-Click Install (easiest)
- Download the extension file from your Settings page.
-
Double-click the
.mcpbfile to open it in Claude Desktop. - Enter your API token when prompted. Claude will connect automatically.
Option B: Manual JSON Config
Add this to your claude_desktop_config.json:
{
  "mcpServers": {
    "substack-notes": {
      "command": "npx",
      "args": ["-y", "substack-notes-mcp", "--token", "YOUR_TOKEN_HERE"]
    }
  }
}
Replace YOUR_TOKEN_HERE with the token from Step 1. Requires Node.js.
Where is the config file?
Mac: ~/Library/Application Support/Claude/claude_desktop_config.json
Windows: %APPDATA%\Claude\claude_desktop_config.json
Run this single command in your terminal:
claude mcp add substack-notes -- npx -y substack-notes-mcp --token YOUR_TOKEN_HERE
Replace YOUR_TOKEN_HERE with your token. That's it — you're done.
Verify it works: Run claude mcp list and you should see substack-notes in the output.
Add this to your Cursor MCP settings. You can find it in Cursor Settings → MCP, or edit the file directly:
{
  "mcpServers": {
    "substack-notes": {
      "url": "https://qvn-mcp.vercel.app/mcp",
      "headers": {
        "Authorization": "Bearer YOUR_TOKEN_HERE"
      }
    }
  }
}
Replace YOUR_TOKEN_HERE with your token.
Config file location:
Project-level: .cursor/mcp.json in your project root
Global: ~/.cursor/mcp.json in your home directory
Verify it works: After saving, check Cursor Settings → MCP. You should see "substack-notes" listed with a green status dot.
Step 3: Test It Out
Once your MCP is connected, try asking your AI one of these to make sure everything works:
Try these prompts:
-
"Show me my notes dashboard" -
"What notes do I have planned for this week?" -
"Show me my recently published notes"
If you see your notes data coming back, you're all set. The AI now has full access to your QVN dashboard.
Getting "Not authenticated"? Double-check that your token starts with qvn_sk_ and that you copied it completely. If in doubt, generate a fresh token from Settings.
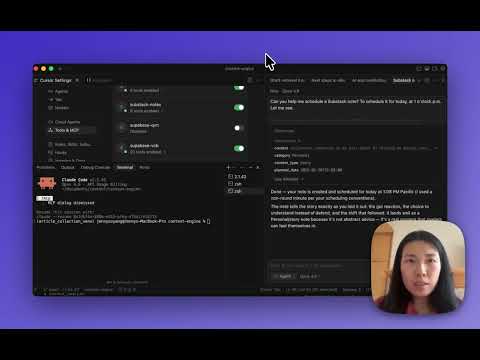
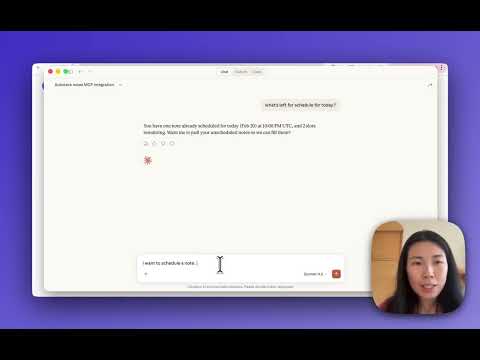
Video Walkthroughs
Prefer watching over reading? These three short videos cover everything from installation to daily usage.

Got stuck? Email [email protected] and I'll walk you through it personally.
Ready to get started?
Generate your token, install the MCP, and start managing your notes from your AI.
Generate Your API Token